Table of contents
You just quickly meant to update a theme on your website and all of a sudden you are left with a blank site and your website doesn’t function properly anymore?
Has something like that ever happened to you? If not, congrats and lucky you!
If yes, you probably also wished that it was possible to make tests in a safe environment before making changes on your live site, right?
Well there is a way to avoid these common problems and the solution is called staging environment.
By creating a WordPress staging site you are setting up a virtual testing environment that allows you to make changes to your design, plugins, or content without affecting the functionality of your live website. As always, we will show you how to do it.
4 ways to set up a WordPress staging site
There are several ways how to set up a WordPress staging site, one of them being the installation of WordPress locally on your computer. For this you will need an appropriate server software, e.g. MAMP or XAMPP.
After installing the server software of your choice on your computer you need to create a local server with a database and a software stack. And that is basically it.
It doesn’t exactly create a WordPress staging site but a reasonable test environment for code changes and plugins. And the live version of your website remains completely untouched.
However this is definitely not the fastest and easiest way to have a WordPress staging environment.
Using a plugin to build a staging site
Setting up a WordPress staging site with a plugin is an easier way to safely test changes to your site before they go live.
- Before installing a new plugin you should backup your site.
- Now you can install the staging plugin of your choice.
- When you access the settings of the plugin you will find an option to create a staging site.
- You have to name your WP staging site before you select the settings you want to copy, such as database content, media, themes, and plugins.
- Now you can start the cloning process. The plugin will now create a copy of your website and place it in a separate directory.
The whole process will take you less then an hour and the cloning of your website will only take a few minutes.
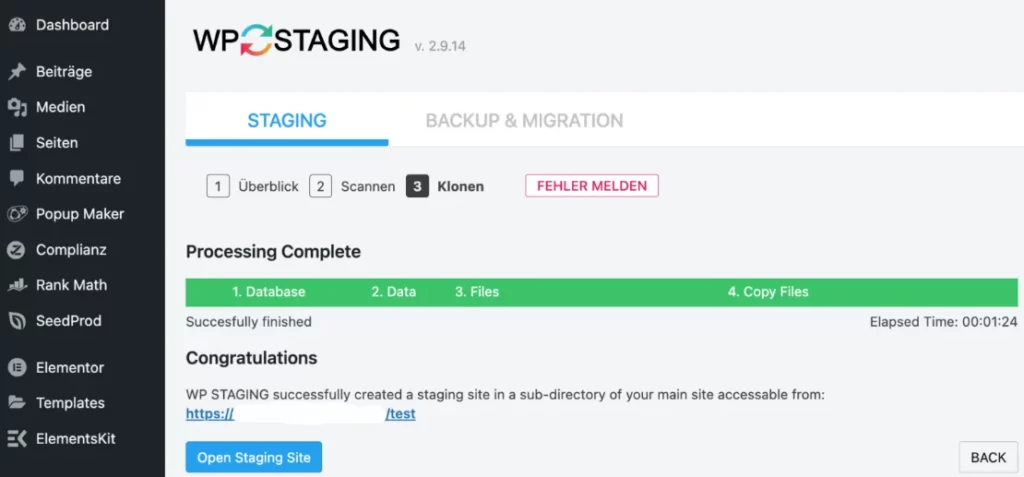
The most popular plugin for doing this is probably WP Staging. It creates a full copy of your site in a separate directory.

Duplicating an existing WordPress installation into a test environment works fine with the free version of the plugin. If you want to do more, like transfer successful changes to the live site or clone the site to other domains or other databases you will need to purchase the premium version.
Another common plugin for this matter is Duplicator. It’s also a versatile plugin that allows you to clone your site and transfer it to a staging environment. Just like with the other plugin there is a free version and a premium version, which gives you more options to choose from.
Setting up a staging site through the WordPress host
Another option to create a staging site for WordPress is by directly using your host. Many WordPress hosting providers offer built-in features for creating staging sites that simplify the process.
Some of them are:
- SiteGround
- Bluehost
- Kinsta
- WP Engine
The procedure of how to set up a staging environment may vary depending on the hosting provider but usually you will find an overview of your websites within your dashboard.
Now you should be looking for an option that says “staging”, “test environment” or something similar.
Select the website for which you want to create a staging site and click the option to set it up. Depending on the host, a separate subdomain or subdirectory URL may be generated for your staging site.
It may take a few minutes to copy all files, content, databases, and settings but then you should be able to test all changes in a safe staging environment.
By the way: Sometimes it’s useful to create multiple staging sites for different purposes, e.g. you could test design changes on one staging site and do plugin testing on a second version.
Staging environment with GREYD
In our opinion, the following option to set up a staging environment is the best out of all. Not just because it involves our product, but because it’s simply the least complicated way of doing this. There is no need for lot’s of technical knowledge.
All you really need is the GREYD.SUITE and you will see how it simplifies the process right away. Here are the key steps on how to create a staging environment for you WordPress website:
First you have to go to the dashboard of your website management tool, GREYD.Hub, where you will find all your websites. Please note that for this matter you need to be a super admin.
It doesn’t matter if it’s a single site installation or if we are talking about a multisite. With GREYD.Hub you can easily set up any number of staging environments within your multisite in just a few seconds.
You can export any website with only one click and import it to a staging site.
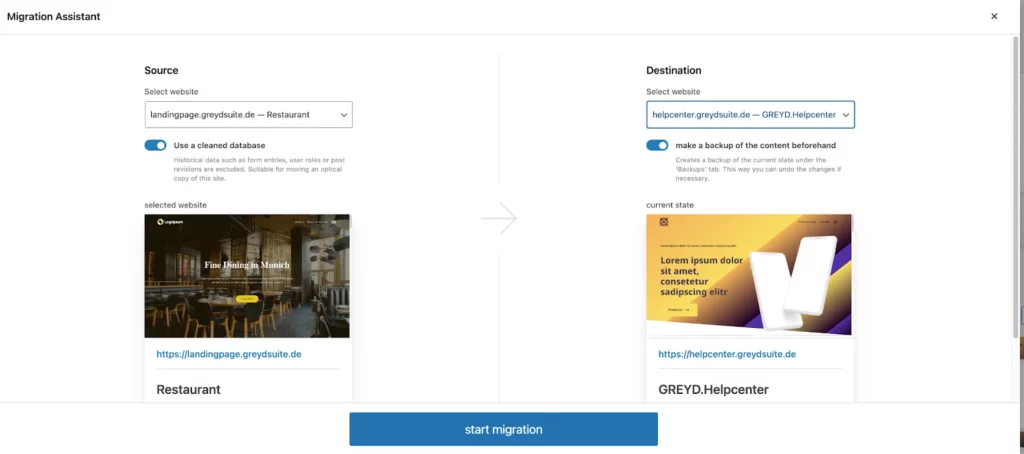
After using this WordPress staging website migrating the staging site to the live domain is just as easy and fast.
Thanks to the migration assistant everything happens in a few seconds and there is no need for any technical know-how.

So far so good. But what if we told you that there is even more to the story. We are currently working on adding an extra staging feature to the GREYD.Hub.
With this feature coming soon you will be able to not only simply copy your live site to the staging site, but also sync it.
This way you can make sure that you don’t lose any content that has been changed or added when putting the staging content live.
The new feature shows you exactly what has been changed in which area so that you have even more control and a better overview.
Why everyone should be using a WordPress staging site
Now that you know how to set up a staging site you might ask yourself if it’s even necessary to have one. Here are a few reasons why using a staging site in WordPress is definitely a good idea.
Avoiding mistakes
When developing or updating a website, errors can occur that may affect functionality or design. These errors could negatively impact the user experience or even affect the security of your site.
A staging site allows you to test changes and updates first in a protected environment without risking the quality of your site. That means less stress and peace of mind for you. And eventually everything will be working smoothly and you will be ready to take it live.
Testing designs and functionality
Whether you want to try out a new theme, make a complex layout change, or test new plugins, a WP staging site provides a safe environment to make sure everything works as planned.
Just like mentioned above you can check the look and functionality of your website in advance. This is how you can ensure that any changes work perfectly fine before they are implemented on the live site.
Easy cooperation
If you’re working as a team or have external developers involved, a staging site is ideal for discussing changes, gathering feedback, and making sure everyone is on the same page.
But it does not only prevent misunderstandings and supports your feedback culture. Via the natively integrated user management feature of GREYD you can also assign custom user roles and capabilities.
This prevents unauthorized users from making unwanted changes and helps you keep your staging site as well as your live site organized and structured.
As you can see, a staging site for WordPress is an essential step for anyone running a website.
It allows you to continually improve your site without risking errors or interruptions. No matter which method you choose, implementing a staging site will greatly simplify your WordPress website development and management.
If you are interested in learning more about WordPress staging environments with GREYD and actually trying the features first hand feel free to book a demo with one of our experts.


